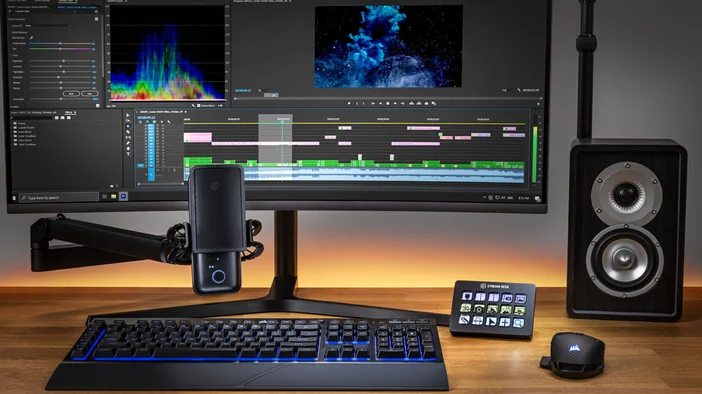
Stream Deck 7.4 introduces MCP support, giving AI assistants the ability to discover and trigger your Stream Deck actions. Instead of tapping a key, you can use an AI tool like NVIDIA G-Assist, Claude, or ChatGPT to activate actions on your behalf.
You still set up actions in Stream Deck app the same way you always have. MCP adds a new way to trigger them. This guide walks through what MCP is, how to set it up, and how to start using it.
What is MCP
MCP stands for Model Context Protocol. It is an open standard that gives AI tools a shared way to connect to apps and services.
Think of it like USB. Before USB, every device needed its own type of cable and connector. USB created one standard that works with everything. MCP does the same thing for AI tools. Instead of each AI assistant needing a custom connection to each app, MCP gives them a common way to communicate.
MCP was introduced in 2024 and has been adopted by companies including Anthropic , OpenAI, Google, and Microsoft. Thousands of apps and services already support it. With Stream Deck 7.4, Stream Deck joins that list.
How it works
The setup has three parts:
- Enable MCP in Stream Deck app and choose which actions you want your AI to access. These go on a dedicated profile called MCP Actions.
- You install a small bridge called Elgato MCP Server on your computer. This is what connects your AI tool to Stream Deck app.
- Tell your AI tool where to find Elgato MCP Server.
Once everything is connected, you can type or speak requests and your AI tool will trigger the matching Stream Deck action. Let's walk through each one.
Set up MCP Actions in Stream Deck
- Open Stream Deck app.
- Go to Preferences and select the General tab.
- Under Elgato MCP Integration, check Enable MCP Actions.
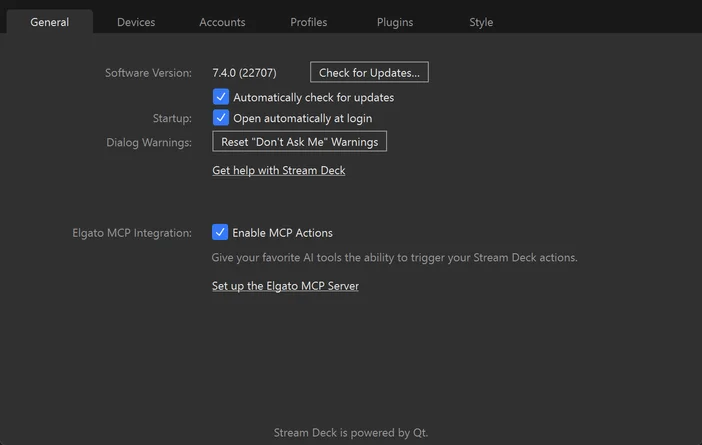
This creates a dedicated profile called MCP Actions, which you can find in the profile dropdown at the top of Stream Deck app.
Drag actions onto its keys from the action panel on the right, just like you would with any other profile. Any action you place here becomes available to connected AI tools. Actions on your other profiles stay private, so you control exactly what the AI can access.
Note: Don't see Elgato MCP Integration in Preferences? Make sure you're running Stream Deck 7.4 or later. Download the latest version here.
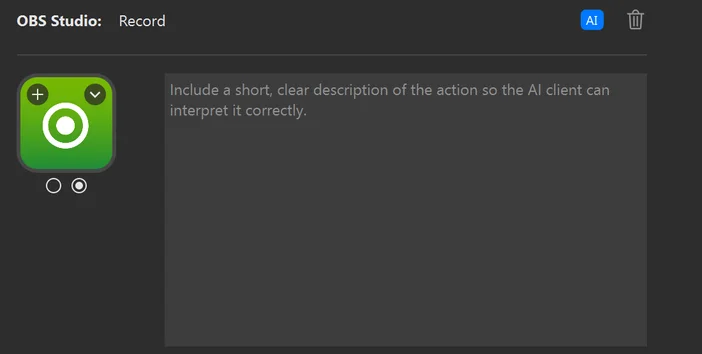
Add descriptions to your actions
Each action on the MCP Actions profile has a description field that tells the AI what the action does and when to use it. This is one of the most important parts of the setup, because it is how the AI decides which action to trigger when you make a request.
To add a description, select an action and click the AI icon in the action settings at the bottom of the screen. Then write a clear, plain description.
A good description answers two things: what the action does, and what kind of request should trigger it. For example:
- For a mute action: "This mutes the system audio."
- For a Key Light toggle: "This toggles my left Key Light on or off."
- For an OBS scene switch: "This switches to my 'Be Right Back' scene in OBS."
The AI matches your requests against these descriptions, so the more specific they are, the better it works. This is especially important when you have multiple similar actions. If you have two Multimedia actions on the profile and neither has a description, the AI has no way to tell them apart.
Install Node.js
Before connecting any AI tool, you need Node.js installed on your computer. Node.js is a free, widely used tool that powers many apps and services behind the scenes. Elgato MCP Server runs on it, and both the G-Assist and Claude Desktop setup paths require it.
If you do not already have it, download and install it from nodejs.org. Choose the LTS (Long Term Support) version. The installer works like any other app. Run it, follow the prompts, and you are done. You do not need to configure anything or learn how to use it.
Install Elgato MCP Server
Elgato MCP Server is what connects your AI tool to Stream Deck app. To install it, open a terminal (Terminal on macOS, PowerShell on Windows) and run:
npm install -g @elgato/mcp-server
This installs it permanently on your computer so it's ready whenever you need it.
If you just want to try things out first, you can skip this step. The setup instructions below use npx, which downloads and runs Elgato MCP Server temporarily without installing anything. It works the same way, but re-downloads each time you start it.
For additional options and details, visit the Elgato MCP Server page on npm.
Connect NVIDIA G-Assist to Stream Deck
NVIDIA G-Assist is an on-device AI assistant for GeForce RTX PCs. Powered by a small language model running locally on the GPU, it responds to voice and text commands. With Stream Deck's MCP support, G-Assist can trigger your actions directly, including by voice.
Gamers can fire off in-game hotkeys or save a clip without taking their hands off the keyboard. Streamers can launch their entire broadcast setup with a single spoken command. Anything Stream Deck connects to, G-Assist can now control.
Start Elgato MCP Server
1. Open a terminal on your computer (PowerShell on Windows).
2. Run the following command: npx -y @elgato/mcp-server@latest --http
3. Leave this window open. You should see a message that the HTTP server is listening on port 9090 and that Stream Deck app is connected.
The server needs to stay running in the background while you use G-Assist. If you close the terminal window, the connection will stop.
Install the plugin for G-Assist
G-Assist uses a plugin to communicate with Elgato MCP Server. Place the Stream Deck plugin folder in the G-Assist plugins directory:
%PROGRAMDATA%\NVIDIA Corporation\nvtopps\rise\plugins\stream-deck
Then restart G-Assist or reload plugins. On first load, the plugin discovers your available Stream Deck actions automatically.
Confirm the connection
You can verify that Elgato MCP Server is running by opening a browser and going to:
If the server is running and connected to Stream Deck app, you will see a status response.
Connect Claude Desktop to Stream Deck
Claude Desktop connects to Elgato MCP Server through a local configuration file. If you use a different AI tool, the general approach is similar, and you can find additional setup instructions on the Elgato MCP Server page on npm.
Claude Desktop stores its MCP connections in a configuration file. You need to add Elgato MCP Server to this file so Claude knows where to find it.
- Open Claude Desktop.
- Go to Settings, then Developer, then click Edit Config. This opens the folder where the configuration file is stored.
- Find claude_desktop_config.json in that folder. Right-click it and open it with a text editor (Notepad on Windows, TextEdit on macOS).
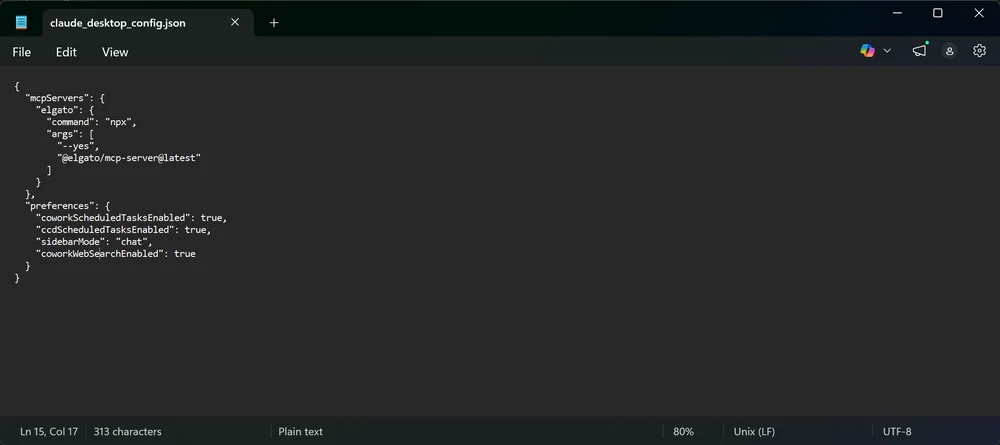
- The file will already have some content. You need to add an mcpServers entry inside the existing structure, not as a separate block underneath.
Find the last } that closes an existing section. Add a comma after it, then add the mcpServers section before the final closing }. Here is what a typical file looks like after the edit:
Everything must stay inside one set of outer curly braces { }, with a comma between each section. If the mcpServers block gets pasted as a separate object below the existing content, Claude Desktop will show an error on startup.
If the file is empty or only contains {}, you can replace everything with:
- Save the file and fully quit Claude Desktop (not just close the window). On macOS, right-click the dock icon and select Quit. On Windows, right-click the system tray icon and select Exit. Then reopen it.
Example of Claude config file.
Confirm the connection
To verify everything is working, go to Settings, then Developer. Under Local MCP servers, you should see elgato listed with a running label.
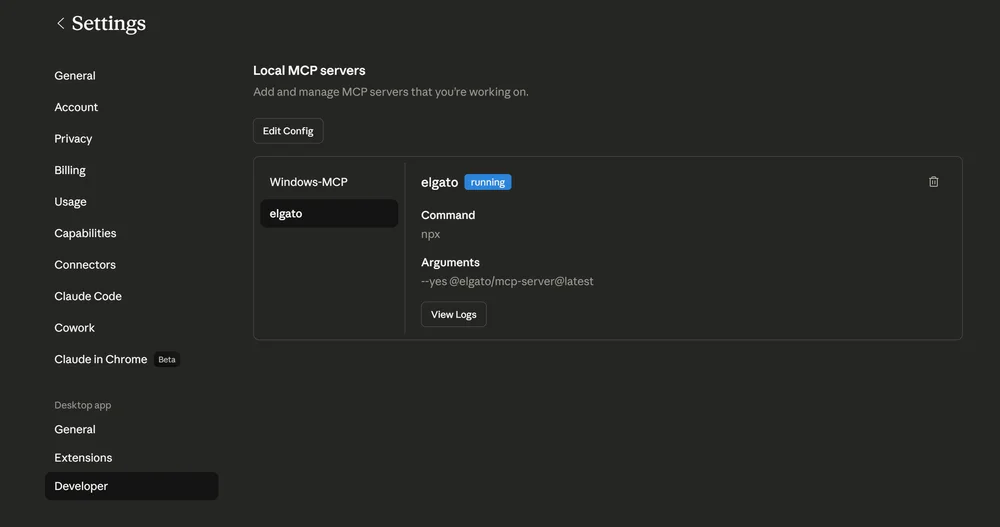
If it does not appear or does not show as running, double-check that Stream Deck app is open with MCP Actions enabled, and that the configuration file was saved correctly. Then fully quit and reopen Claude Desktop.
Connect other AI tools
Claude Desktop and NVIDIA G-Assist are two common options, but any MCP-compatible tool can connect to Elgato MCP Server.
For full setup details, other connection methods, and advanced configuration, visit the Elgato MCP Server page on npm.
Try it out
Once your AI tool is connected, try asking it to check your available actions. With G-Assist, just say "What Stream Deck actions do I have?" With Claude Desktop, type the same thing in a new conversation.
If the connection is working, the AI will list the actions on your MCP Actions profile along with their descriptions. This is a good way to confirm everything is set up correctly.
From there, just ask for what you need. Say "mute my audio" to G-Assist or type it in Claude Desktop, and the AI will find the matching action and trigger it. It works the same way as tapping the key on Stream Deck.
Troubleshooting
If an action does not trigger, check the following:
- Stream Deck app is running and Enable MCP Actions is checked in Preferences.
- The action is on the MCP Actions profile, not a different profile.
- Your AI tool is connected to Elgato MCP Server. In Claude Desktop, go to Settings, then Developer, and confirm elgato appears under Local MCP servers with a green running label. For G-Assist, check that the terminal window running the server is still open and shows a connection to Stream Deck.
Wrap-up
Elgato MCP Integration in Stream Deck 7.4 is a first step toward deeper AI connectivity. As the MCP ecosystem grows, so will the ways AI tools can work with your setup.
To expand what your MCP Actions profile can do, explore plugins on Elgato Marketplace. Any plugin action you can place on a Stream Deck key can also be triggered through MCP.
PRODUCTS IN ARTICLE