MANUEL | GUIDE DE DÉMARRAGE RAPIDE
How to Set Up and Use Elgato Wave Cast for Dual PC Audio
Dual PC setups are the pinnacle of streaming with their dedicated machines for each task, improved reliability for staying live, and for the absolute best performance. However, audio has historically been a headache with figuring out where to connect your mic and headset. Getting game audio to the stream, but also getting your mic over to the game to chat with teammates. Elgato Wave Cast makes this simple by sending audio back and forth between both computers over your network.
We’ll show how to set up and use Wave Cast on your Dual PC setup.
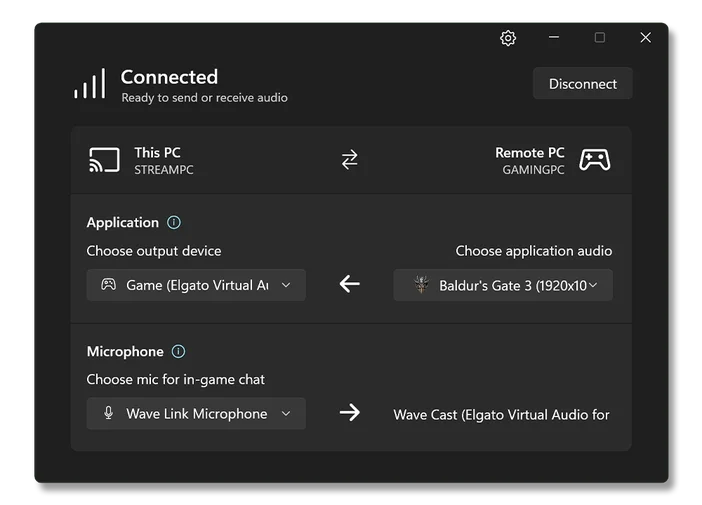
Wave Cast Interface
Requirements
Before starting, you will need the following for Elgato Wave Cast
- An Elgato Marketplace account
- Two PCs connected to the same network (Ethernet is recommended for best results)
- Windows 11
Elgato Wave Cast requires two PCs with Windows 11 to function. Windows 10 is not supported.
Downloading and Installing
First, purchase Elgato Wave Cast from Marketplace.
After purchase, you’ll need to download Wave Cast to your PC and then copy the license key for activation. If you need to find the license key later:
- Click on your profile image on the top right and click on Manage your account.
- Click on Products on the left.
- Click on Wave Cast to filter down.
- Click on the card for Wave Cast.
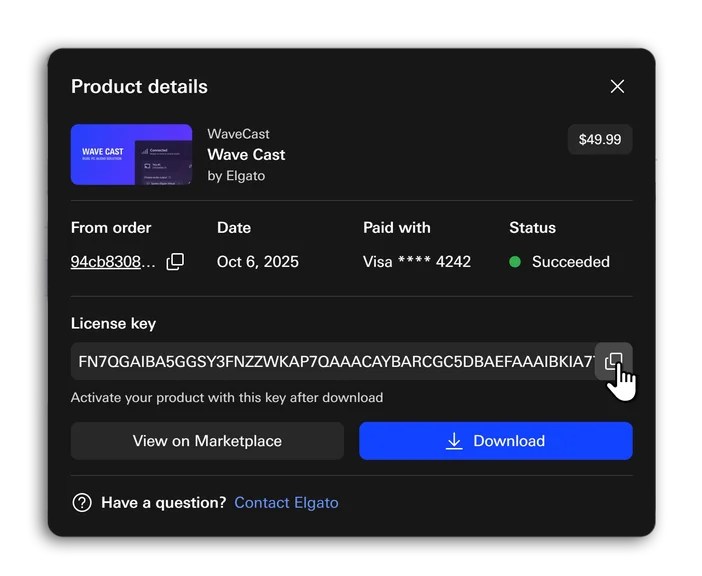
Marketplace order details showing download button and license key
Next, install Wave Cast on both of your Windows 11 PCs. After install, copy the license key provided from Marketplace and paste it into the activation window, and click on Unlock.
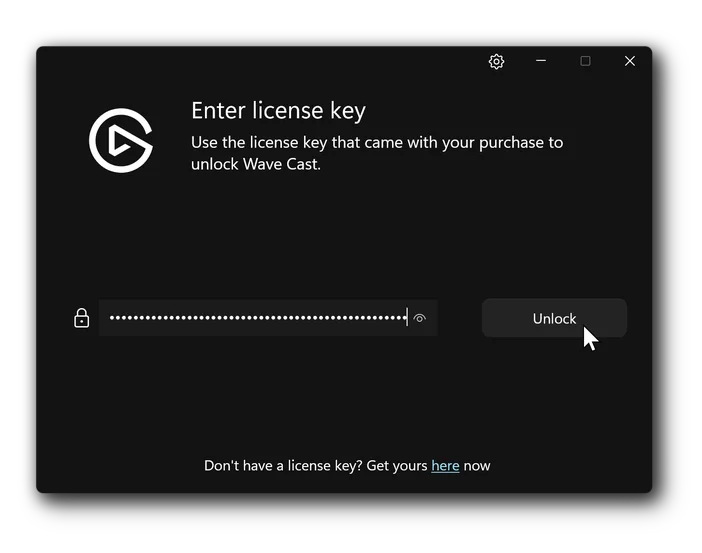
Wave Cast activation screen
You only need to do this on one of the computers. The other PC will activate automatically once you connect to it.
Exploring Wave Cast's Options - Switching PCs
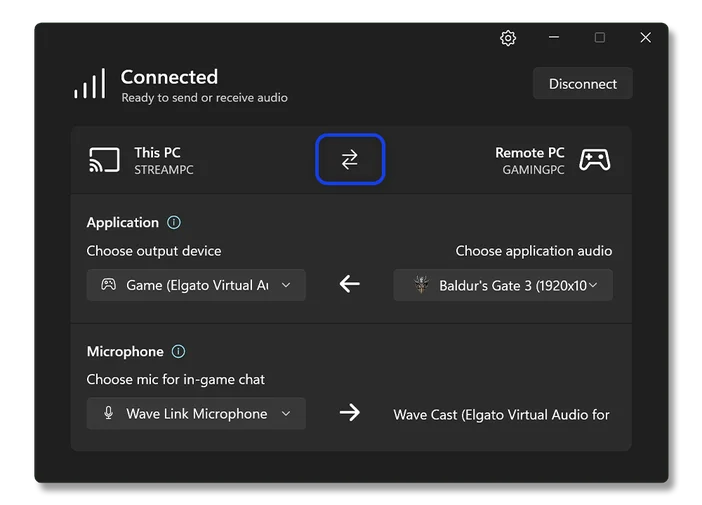
Wave Cast Interface showing System Switch button
Starting at the top you’ll see a button with two arrows. Clicking this button switches which PC is the Gaming PC and which is the Streaming PC, and as a result how audio is captured and transferred.
Wave Cast designates the Gaming PC as the one which captures audio from a specific app, the app currently in the foreground and active, or all audio and then sends this captured sound to the Streaming PC. The Gaming PC also receives microphone audio from the Streaming PC to be used in voice chat apps like Discord running on the Gaming PC or for in-game voice chat.
Conversely, the Streaming PC receives audio from the Gaming PC to have it added into a stream or recording. The Streaming PC also sends a specific microphone device out to the gaming PC.
Because of this relationship between both systems, it’s intended that your Streaming PC is where you connect your headphones/headset and microphone. This provides the most flexibility for mixing and effects.
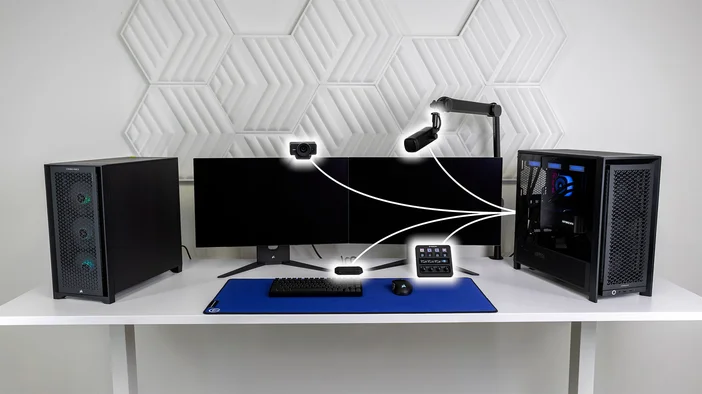
Example Dual-PC setup with Gaming PC on left and Streaming PC on right. Most accessories controlled by Streaming PC
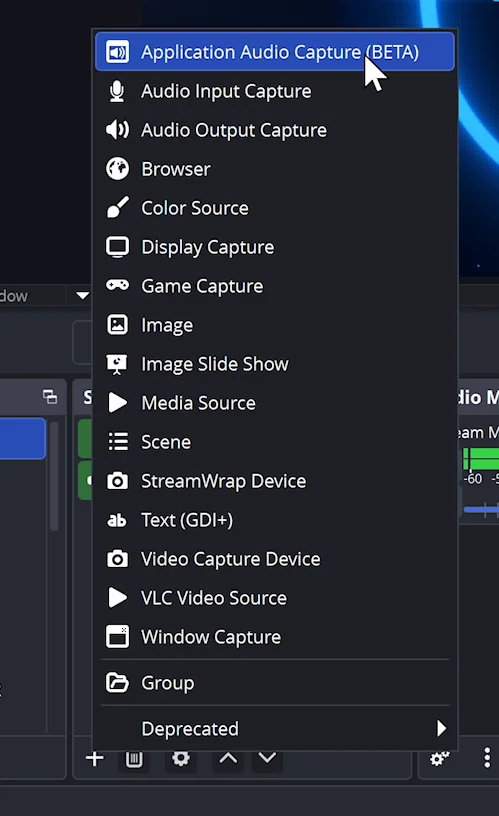
App Audio Capture
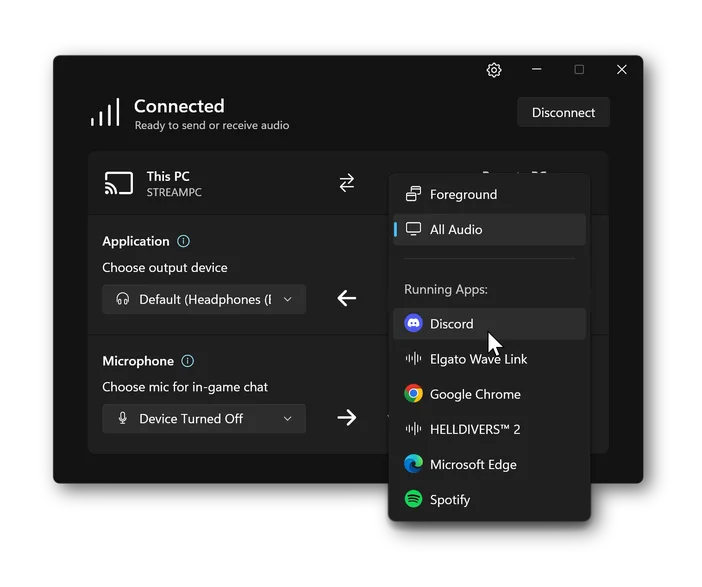
Wave Link Interface showing specific applications and different automatic modes
First, decide which PC is your Gaming PC using the switch button mentioned earlier.
Next, decide on what audio is being captured.
- All audio
- A specific app from a list like a single game
- Foreground app
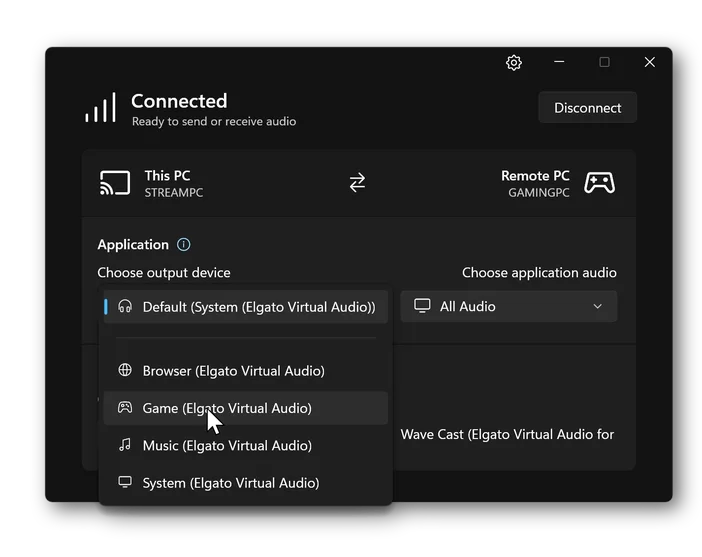
Output Device selection showing Wave Link channels.
This audio is then sent to a specific device on the streaming PC. These are called output devices, however they can be physical outputs like speakers, headphones, headsets, etc. Or virtual devices such as the channels inside of Wave Link.
For instance, you can have Wave Cast output to the Game Channel in Wave Link. From there Wave Link can be used to mix this audio with all your other sounds before forwarding onto your headphones and/or sent to streaming and recording apps like OBS Studio.
Microphone Selection
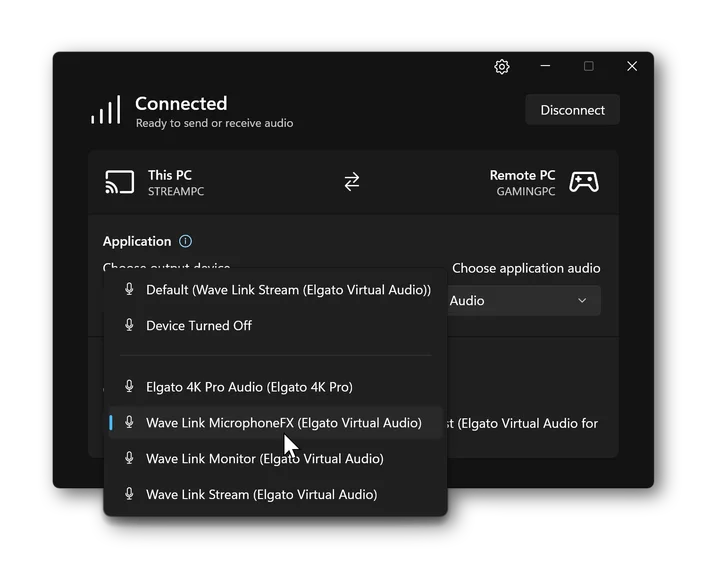
Next, decide which microphone or input on the Streaming PC to forward onto the Gaming PC. This could be a headset mic or your high end XLR Microphone connected to Wave XLR.
With Wave Link, add on additional effects like Voice Focus, EQ, Compression, and more and use MicrophoneFX with Wave Link 2.0. Or create a custom output mix in Wave Link 3.0 and select this in Wave Cast and use your enhanced microphone sound in-game and chat.
You can control both PC’s configurations from either computer. Saving you time from needing to switch between two sets of mice and keyboards.
At this point, app audio and mic audio is being transferred between both PCs already. Time to configure other apps to work with Wave Cast.
Streaming PC Setup - Wave Link
If you are already using Wave Link on the Streaming PC to mix audio and send a full mix over to OBS Studio or similar app, you can either set a Wave Link channel as the Output Device in Wave Cast like shown earlier.
Or add Wave Cast as an Input Channel inside of Wave Link as shown below.
Your Gaming PCs audio is now being mixed and sent to OBS Studio and ready to be streamed or recorded.

Streaming PC Setup – OBS Studio
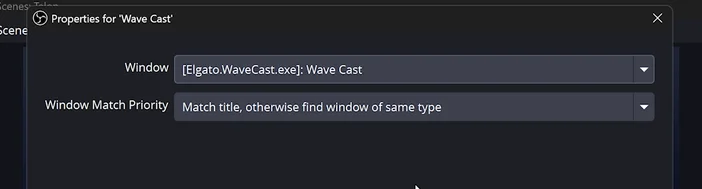
If you’re not a Wave Link user, inside of OBS Studio’s source list, add a New Application Audio Capture source. Then choose Wave Cast from the list. This source type taps into the Wave Cast app directly to add it into OBS Studio without needing to capture audio from a device like your headphones first.
Gaming PC - Microphone Setup
Over on the gaming PC, make sure that Wave Cast is set as your microphone in game’s audio settings for any in-game voice chat. Same is true of any voice chat apps you wish to run on the Gaming PC. While running all voice chat apps on the Streaming PC is easiest for mixing, you may find running apps like Discord on the Gaming PC ideal due to overlays or faster controls.
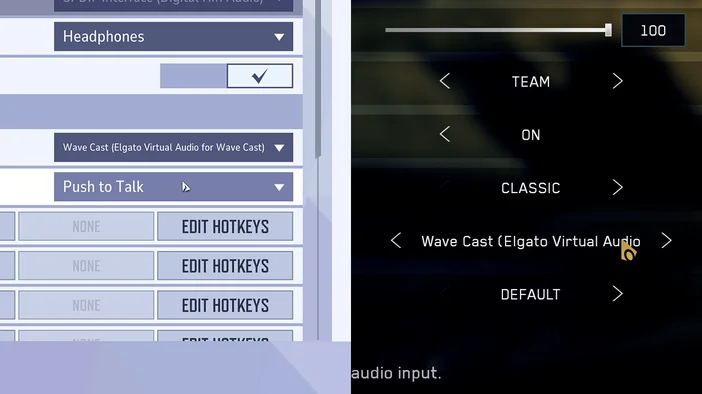
Wave Cast's virtual microphone set inside of PC game audio settings
Same is true for Windows 11's audio settings. Setting Wave Cast as the default microphone will mean that any apps will automatically use it. You can also disable other audio inputs to prevent this changing.
Tweaking and Troubleshooting
Since Wave Cast sends audio over your network, having a reliable and fast network connection is critical for the best experience. While Wave Cast can be used on a Wifi connection, we highly recommend using a wired ethernet connection for both computers.
Wave Cast does not send any audio out to the internet. Your internet connection itself has no impact Wave Cast performance.
If you experience any gaps in sound or stuttering, consider increasing buffering.
- Go into Preferences by clicking on the Gear Cog icon.
- Go to the Network tab.
- Adjust Audio Latency further to the right.
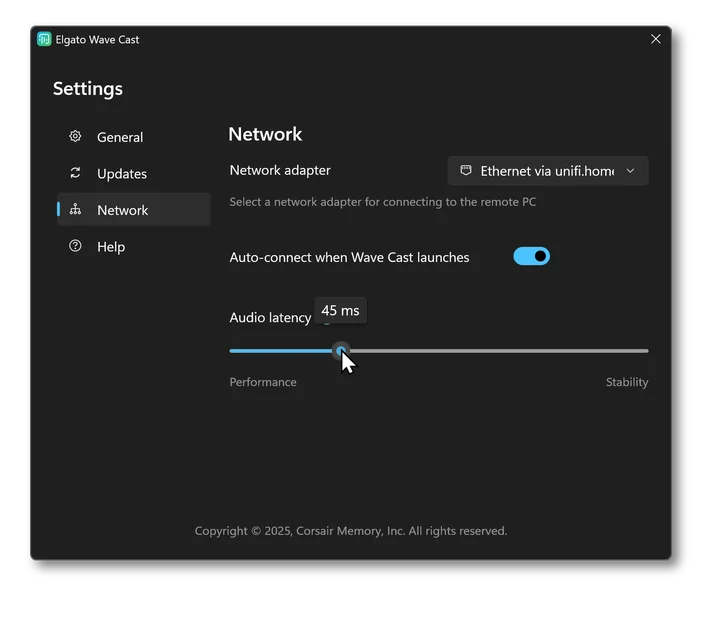
Increasing Network Buffering means that Wave Cast holds onto more audio at one time to smooth out any hiccups or stutters in the network connection. Just like how streaming video from Twitch or YouTube will have some amount of buffering to allow for continuous video playback. Higher buffering results in a more stable audio experience but increases latency.
Higher latency means that when something happens on the Gaming PC, it would take longer for you to hear it on the Streaming PC.
You want this set as low as possible while having no stutters or audio drop outs.
On this same Network page you can select which Network Adapter to use for Wave Cast. If you use both Wifi and Ethernet, or use multiple network adapters, you can choose the adapter that connects to the network that the other PC is connected to.